1C. Can I swap Impellers for more load capacity or speed?
In most cases, the answer is no but sometimes you can swap an Impeller to gain either low end power or top end speed. Increasing the one will most likely decrease the other which is why it is rarely recommended.
2C. What is the ideal clearance between the impeller and liner?
Anywhere between .025" and .035" is a good spot. If you set it tighter that .025" you risk scraping the liner and if you set it looser than .035" you will lose performance.
3C. Do we have adaptors to fit a particular jet drive to different motors?
No. There are too many differences in motor mounting bolt patterns, water pumps, driveshaft diameters, length, spline and shifting mechanisms. The model letter designation will fit only those motors listed in our jet drive kit list
4C. Does a stainless steel impeller improve performance of a jet drive?
They do but keep in mind that the effects diminish as you venture into smaller outboards. They are still a great option for those looking for a durable, long lasting Impeller no matter how big their engine is.
5C. How do you remove frozen hardware?
With lots of luck, Liquid Wrench, Kroll, WD-40, heat, chisels and drills. Salt water is murder. We use all stainless steel hardware and aluminum, but the best way is to remove the jet drive once a year, wire brush the hardware, lubricate with grease or "Never Seize," and reassemble. You won't have difficulty after that
6C. What can cause RPM to be too low or too high?
Impeller pitch and diameter is based on sea level operation. At higher elevation, you will lose RPM and may have to drop down one impeller size. Long use in corrosive conditions may create pin holes in the exhaust tube which builds up back pressure and reduces RPM. Excessive RPM is usually caused by air entering the pump. It can be caused also, during start up, if the leading edges of the blades are blunted from gravel. A rough boat bottom, keels or damage ahead of the intake can introduce air, as well as setting the motor too high.
7C. Moisture in grease - when do seals have to be replaced?
Grease coming out the lube hose is usually light gray. A few droplets of water coming out of the hose is to be expected but any more than that usually means, that the seals are leaking and should be replaced. If you grease after the days use, so that the bearing is not stored with moisture in it, you can delay replacement until it is convenient.
8C. How do you sharpen impeller blades?
We have an instruction sheet entitled "Impeller Sharpening" which can be faxed to the customer, or open the Impeller Sharpening PDF
9C. How much gouging can a liner have before it needs to be replaced?
Gouging from gravel is normal. There is considerable surface on the liner to provide pressure sealing. If it is worn such that all the shim washers are on top of the impeller, and blade clearance is still more that 1/32 inch, the liner and/or impeller need to be replaced. If you do replace the liner because of gouging, check performance before and after replacement to see how much, if any, loss the gouging caused.
10C. How do you flush a jet that doesn't have a flushing hole?
On jet drives in which the cooling pump is attached to the top of the bearing housing, it is not possible to provide a flushing inlet. Immersing the jet drive in a barrel of water doesn't work either, because the water is thrown out. Backing the boat into some fresh water is the only solution. Present production provides a flushing inlet where it is possible to do so, depending on the model. If the parts book shows a flushing bolt and sealing washer, and your early jet drive does not have this, it can be added. Where to locate this threaded hole is called out on our engineering drawings. Click HERE for more information.
11C. What's the difference between the 7 3/8, 7 3/8 D and 7 3/8 V6 impeller?
The outside diameter is the same, but the pitch is steeper going from 7 3/8 to 7 3/8 D to 7 3/8 V6 to handle higher HP.
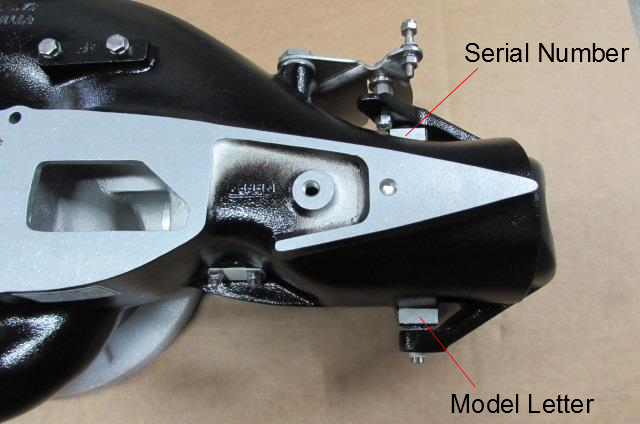
12C. Where are my Serial Number and Model Identification Letters located?
Use these images to identify the location of your Serial Number and Model Identification Letters.
New Models

Old Models
13C. Why is the back of my boat being sprayed with water?
Most often, this problem can be attributed to a low mounted intake. If your intake is not lined up with flow of water, it will deflect flow upwards, spraying the boat and hindering performance.
14C. What is the typical trimming procedure of an Outboard Jet?
Contrary to popular belief; In general, trimming a Jet does more harm than good. The height and angle of the Jet is paramount to performance.
15C. Why can’t I order Outboard Jet products online?
Outboard Jet parts are very specific. Our team is here to assist you so that you get the right parts and ready to offer advice to improve your performance.
16C. Why is my Jet producing low RPM?
If your Jet is producing 5000 RPM or better, you are within acceptable range. Many outboards, especially Four Strokes are rated much higher; however, our Impellers tend to cavitate at those speeds. The ideal RPM for an Outboard Jet is between 5200 and 5400 but 5000 is adequate.
17C. Why is my Jet rattling at idle?
This is caused by vibration created by the Impeller. A Torsional Damper can be purchased to muffle this vibration, but it isn’t necessary as this rattle doesn’t damage the Jet in any way. For installation of Torsional Damper, See FAQ 40C.
18C. I have an old Jet; Can I still get parts for it?
We still carry lots of parts for older units.
19C. When I grease my unit, nothing comes out of the hose, what’s wrong?
Most likely, your seals are worn and must be replaced. Check and see if grease is pooling on the other side of the unit. If it is, then you should think about replacing seals. If you can't find where grease is escaping, start by removing the Impeller. If there is no grease there, dismount the entire Jet and remove the water pump. The missing grease is most likely in one of those locations and will need to be wiped up. Unscrew the lube hose and try greasing again. If this problem started when you assembled or re-assembled your Jet, Check to make sure the Bearing Carrier is fully seated.
20C. My Intake grate keeps clogging, what can I do to reduce this problem?
Aftermarket stomp grates are available. Some have resorted to removing grill bars but, in most cases, this is a bad idea.
21C. It seems that there is a lot of conflicting information in regard to Outboard Jets, How can I find the correct answers?
The world is full of opinions, but we are happy to set the record straight. Call or Email us anytime.
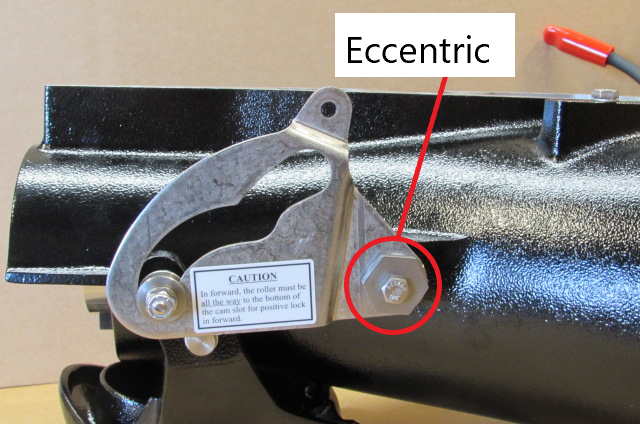
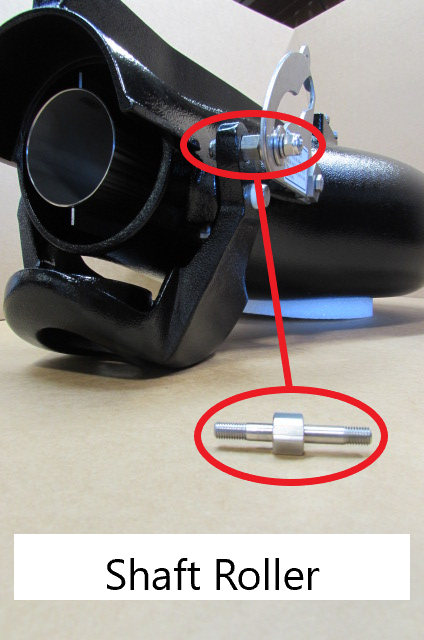
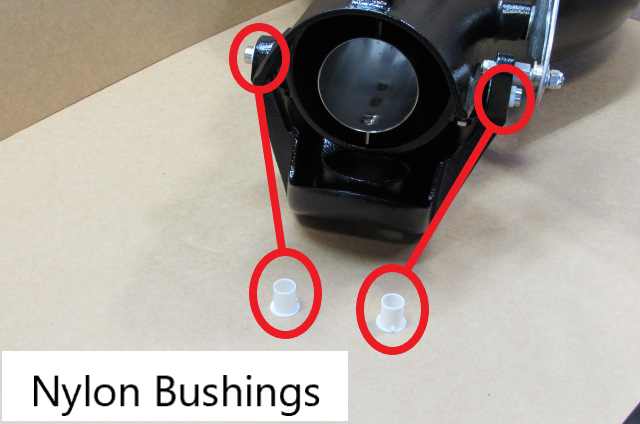
22C. I'm having a lot of trouble shifting my Reverse Bucket, What causes this?
There are a few things to check. First, make sure that your 1043 Shaft Roller is not bent; Make sure that the nylon pin bushings are not worn out. You may also need to adjust your eccentric. The PDF titled 1222, 1223 Reverse Gate Cam Backfit Kit can be found on this website in Miscellaneous Instructions. That document is very helpful. Another thing you may need to check would be your shift cable. Sometimes cables can stretch which will require them to be adjusted. In other cases, the lining of the cable can crack and break.
23C. I run in salt water, What effects with this have on my Jet? Do you offer a special lower unit specifically for salt water? How can I reduce corrosion?
Outboard Jets were designed for freshwater use. Over the years, we have made improvements to the product to better withstand saltwater corrosion. However, special attention must be paid to the unit to reduce the harmful effects of salt water. The Jet should be dismantled at least once a year and the user should make a habit of replacing fasteners. Saltwater is also known to wear down seals prematurely so is something else you should keep an eye on should you choose to run salt water. Flushing is effective in reducing corrosion and should be done religiously after each use. Flush adapters can be purchased. If you are interested, call us at 510-562-6049.
24C. What is the purpose of Intake Fins? Are they a good fit for my boat?
Intake Fins are designed increase water pickup. This will reduce cavitation, particularly in chop. They also act as a makeshift rudder which will improve handling especially on flat bottom boats. Intake fins are a good fit on almost any setup. The only possible downside is that they run the risk on snagging however this is not an issue of tunnel boats.
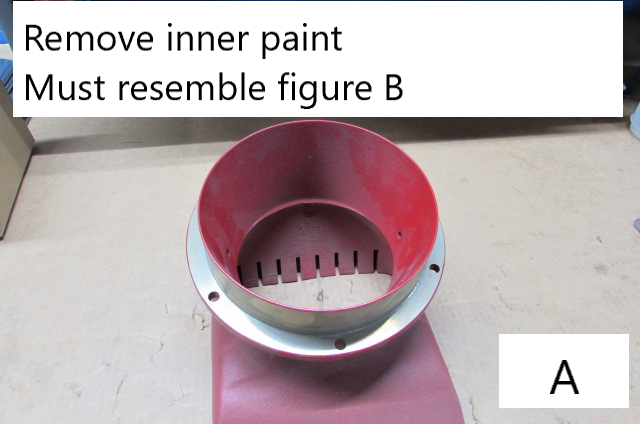
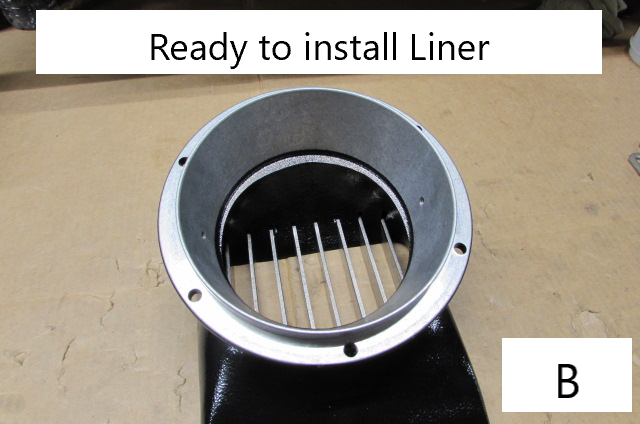
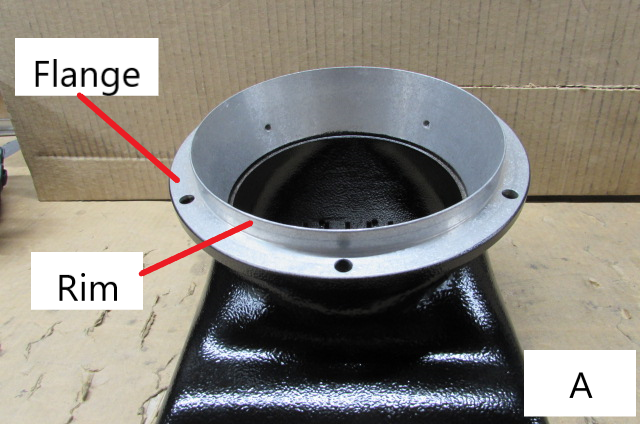
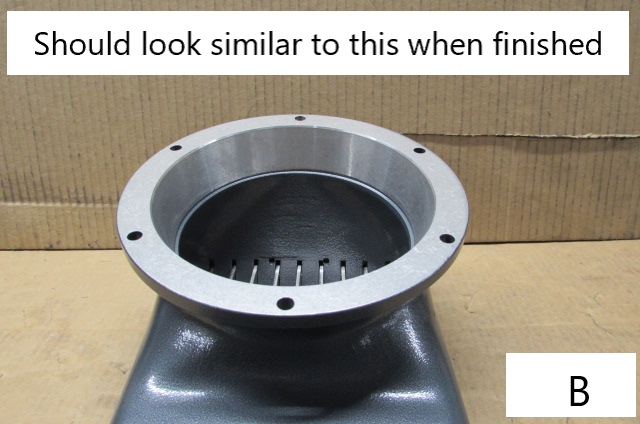
25C. I bought a new bolt in liner, but it won't drop in far enough to line up the bolts. How do I install it?
The liners are designed to fit very tight so that they don't come loose. Try pounding the top with a rubber mallet. If you have a very old intake that is painted on the inside (Figure A) then you need to remove the paint to properly fit with our current design (Figure B)
26C. My boat is pulling to the right. How do I fix this?
Your exhaust tube has two tabs. One on top and one on the bottom. Bend those tabs toward the starboard side of the boat to remedy this issue.
27C. What parts should I keep on hand?
Little parts such as Impeller Keys, Nut Retainers and Gate Bushings are always good to have on the shelf. Also, it never hurts to have an extra Liner. Click HERE to see our parts kits.
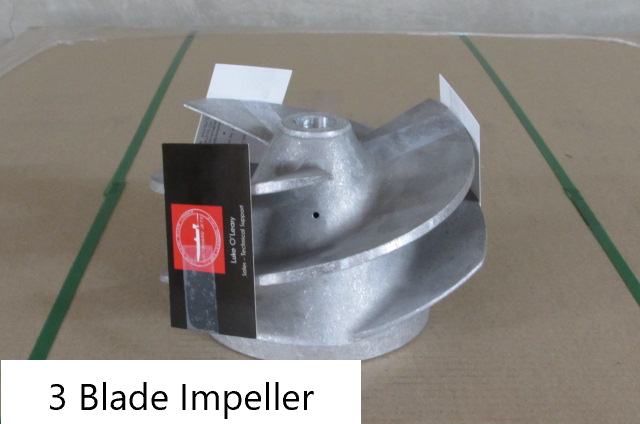
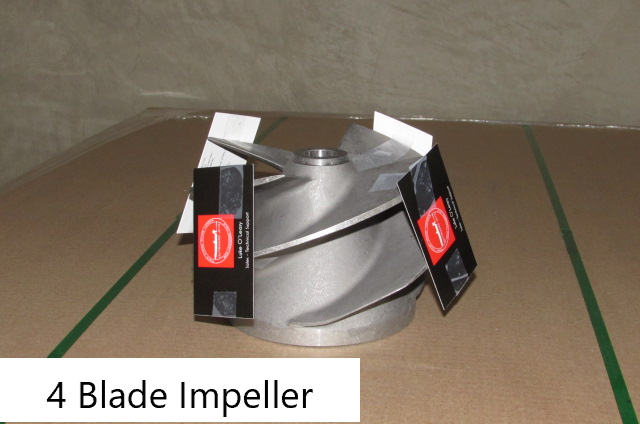
28C. What kind of difference will I see running a 4 blade Impeller?
4 blade impellers were conceived to offer better load capacity and holeshot.
29C. I cracked my intake shoe; Can I weld it up?
Yes, you can. They are made of 356A aluminum.
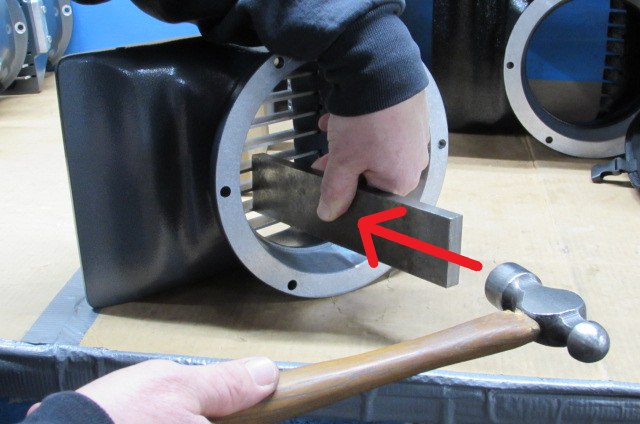
30C. I am trying to remove my grill bars, but the pins won't budge, what can I do?
This can be a difficult task. Every time the intake bottoms out, the grill bars dig into the pins that hold them. The best way is to hammer them back the other way. Turn the intake on its side place something hard against bars, Then begin to hammer. Be sure to hammer each bar. Once this is done, Try hammering out the pins with a punch. Please see Image.
31C. My Liner seems to be wearing only on one side, How do I fix this?
You need to center your Liner and Intake around the Impeller. The 6 mounting holes on the Intake are larger in diameter than the studs that go through them giving you room to adjust the position of your intake. The easiest way to achieve this would be to attach business carts to the outer edges of Impeller blades, then the liner and intake automatically center themselves when you bolt them on. See Images.
32C. Should I fold down both tabs on my nut keeper or just one at a time?
We strongly recommend securing both tabs. Keeping an extra nut retainer on hand is something every jet boater should do. A busted nut retainer will end up costing you a lot more than a simple three-dollar part.
34C. What grease should I be using?
Historically, our Jets have called for the very thin NLGI-1 Lubriplate 630-AA however in recent years, slightly thicker NLGI-2 Greases such as the Lubriplate 630-2 and Quicksilver 2-4-C grease have proven very effective. All three are approved by Outboard Jets for use on our products. They can also be purchased from us.
35C. Can I purchase parts in person?
We do allow pickup, but you must call ahead. We do not accept walk-ins.
36C. Once I place an order, How fast will I get my parts?
If the parts are in stock, you should receive your order within a week if you live in the United States. International orders vary. We offer expedited shipping, but it is very expensive.
37C. Are any parts on my Jet interchangeable with other models?
In some cases, parts are interchangeable, but you should check with us first. Just because it fits doesn't mean it's correct.
38C. My exhaust tube has rusted through and now has perforations. Should I replace it?
Yes. A perforated exhaust tube should be replaced immediately. If the tube becomes filled with water, the exhaust will not be able to escape which will damage your powerhead over time. See Next FAQ for replacement instructions.
39C. How do I replace my exhaust tube?
The first thing you will need to do is dismount the Jet from the outboard (See Question 76) Then you will need to shift the gate so that it is out of the way. Next, Remove the U-Bolt that holds the exhaust tube. To remove the U-Bolt, you must remove the two 10-32 Nyloc nuts that hold it in. These can be found side by side on the starboard side of the pump. Then, push the two threaded ends of the U-Bolt into the pump. You may need to use a small punch to push it in completely. Once you do this, The U-Bolt should slide out of the exhaust tube simply by tilting the Jet. Next, Using a C-Clamp pull the exhaust tube side to side to loosen it from the housing. This should make it easier to wedge out. The tube will slowly inch itself out of there. Exhaust tubes are pressed in tightly so expect resistance. Once the Tube is removed, you must press in the new one with the tabs at 12 O’clock and 6 O’clock. Be sure it is pressed in all the way or else the gate will not clear. Now you must drill through the two holes on the starboard side with a #5 Bit so that you can install the U-Bolt. Be sure that this is done with the Exhaust Tube installed. The last step is the most difficult. You must now insert the U-Bolt through the tube and line it up with the two holes. After that, install the Nyloc Nuts and ID Tag if your Jet has an ID Tag.
40C. Where does the Torsional Damper go?
The urethane washer must sit above the steel cup and neither one should have direct contact with the Impeller or the Nut Retainer. They should be placed somewhere in the middle of the Shim Stack.
41C. I can't get the boat to flatten out, the bow is way up in the air. How can I fix this?
This is usually caused by improper weight distribution. Many Jet Boats have a forward console or find other ways to shift weight toward the bow which will level out the boat. Float pods and trim tabs can work as well. See FAQ 42C for info on Float Pods.
42C. What are floatation pods, and can I use them with a Jet?
Floatation Pods are boxes that attach to your boat transom. These boxes are filled with foam designed to enhance buoyancy. The effect is a draft reduction for the stern of your boat, particularly during takeoff. Because Jets are designed to shoot water into the open air, a boat that sits low in the back with have issues planing and cruising.
43C. What is the easiest way to shim my Impeller?
First you must center the Impeller, See FAQ 31C. Then, you can check the clearance with a feeler gauge set. If you have a Flanged Liner, Install the Liner without the Intake for this process. The desired clearance is .030 but anywhere between .025 and .035 is within acceptable range.
44C. I have a Yamaha 4 stroke Jet that is overheating at idle? How do I resolve this?
Many Yamaha 4 strokes have an issue with over cooling. Because of this, Jet Drive versions use a modified water pump housing with a pressure relief hole. If you are experiencing this, increasing the idle by 50 to 100 RPM should fix the problem.
This should only be done by an authorized Yamaha service center.
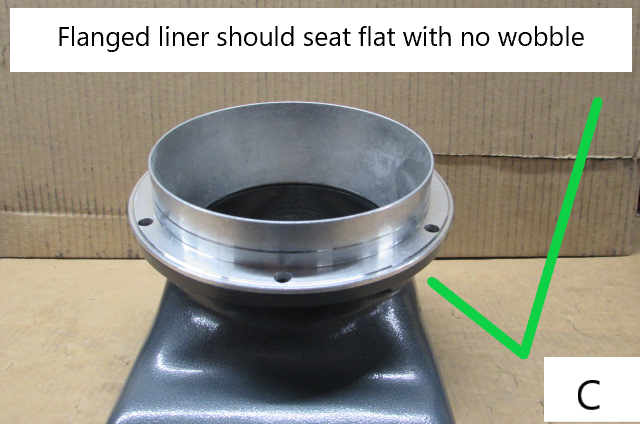
45C. Can I convert a bolt-in intake to a flanged intake?
This can only be done on Large 4-Bolt Intakes and Medium Intakes. Does not apply to Small Intakes or Large 2-Bolt Intakes. You must cut off the rim of the intake so that the Flange on the Liner can sit right over the Flange on the Intake. Also make sure no burrs are left behind after cutting; The liner must seat perfectly flat. See Images Below.
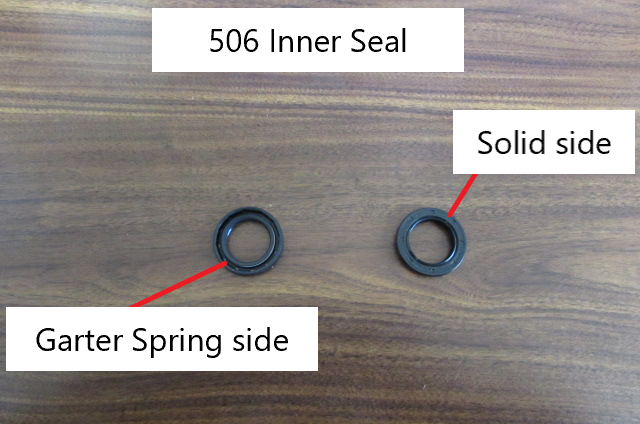
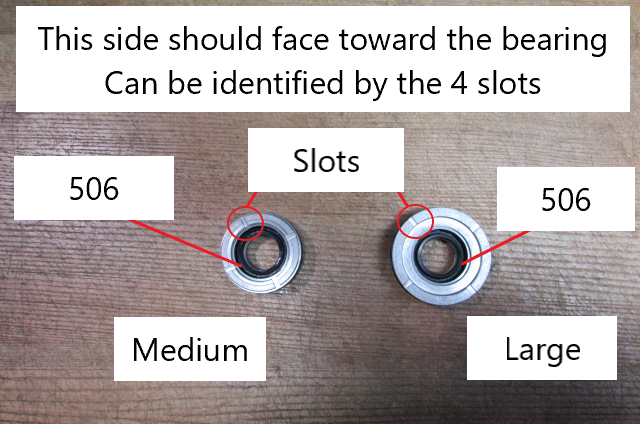
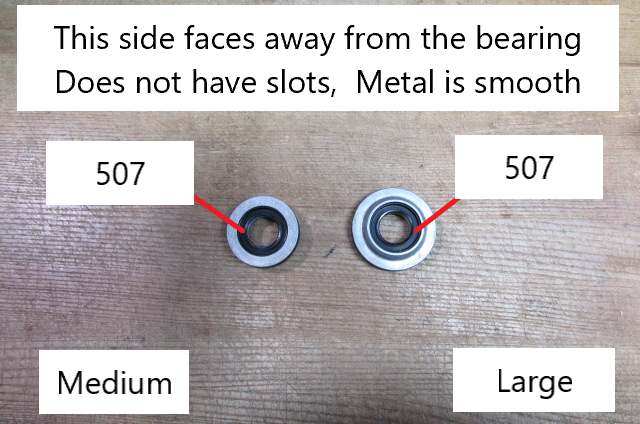
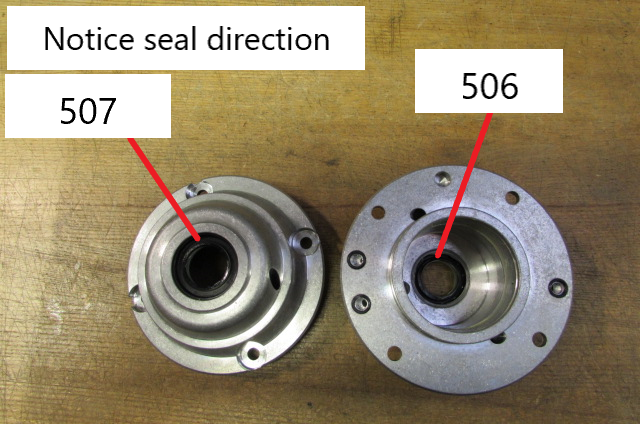
46C. Which direction should my seals face?
Each Jet has 4 seals total, two of part #506 inner seals and two of part #507 outer seals with one of each on either end of the bearing assembly. We have found that by installing the seals back-to-back with the solid sides against each other and the garter spring sides facing out, the seals perform better and last longer. Look at the diagrams below.

47C. How do I identify which Impeller I have?
The bottom tip of the Impeller Hub should be marked with a part number and size (See Image Below). If not, measure the Liner (See FAQ 48C) and call Outboard Jets.

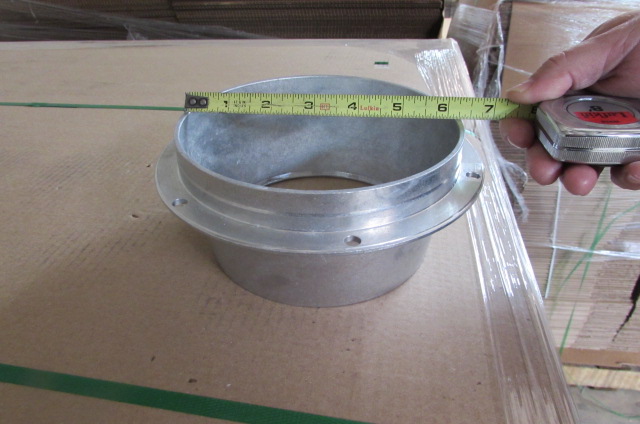
48C. How do I measure the size of my Liner?
The Liners are tapered. Measure the inner diameter of the larger end of the Liner.
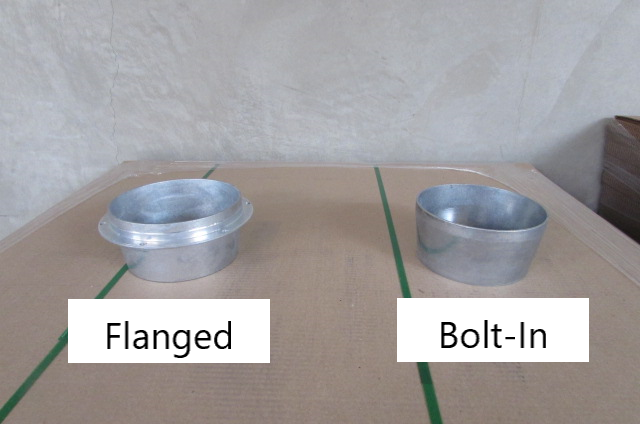
49C. Do I have a Flanged Liner or a Bolt-In Liner?
See Image Below.
50C. My shaft is wobbling from side to side, is this a problem?
If you remove your Jet from the outboard, you will notice wobble, but this is not cause for concern. This is just play in the bearings. Once you install the unit and the shaft is inserted into the crank, the wobble will disappear.
51C. My Impeller seems to be able to move up and down on the driveshaft, Should I be worried?
No, The Impeller and driveshaft do have some play up and down but as soon as they start spinning, the Impeller will pull itself downward. You will most likely notice this when shimming the Impeller.
52C. Which direction should my Bearing face?
The Bearing or Bearings are printed with a part number and a designation. The letters on each Bearing must always face toward the threaded end of the Shaft. A Bearing installed upside down will fail within minutes. For Seal Direction, see FAQ 46C.
53C. How do I winterize my Outboard Jet?
Unless you live in a place with subzero temperatures, no winterization is necessary. If you do live in the arctic, remove the Jet from the outboard and stow it inside the house.
54C. How do I measure the size of my Impeller?
Many Impellers are marked, See FAQ 47C. If your Impeller is not marked, then you can measure the liner, See FAQ 48C.
55C. My Impeller is stuck on my shaft; How do I remove it?
This is most likely caused by an Impeller Key jammed between the Impeller and the Shaft. If you live in a cold climate, the Impeller could be frozen on the plastic sleeve. If this is the case, you should sacrifice the sleeve by melting it.
If this is not the case and the key is wedged between the flat on the shaft and the slot in the Impeller, the best method for removing the Impeller is a pair of pry bars on the outer edge of the Impeller. Be sure to apply penetrating oil to the Key, Shaft, and inner bore of the Impeller first.
56C. I unbolted my Driveshaft, but it is stuck in my Housing, How do I remove it?
Sometimes, corrosion can cause the bearing carrier to stick to the volute. Try applying a penetrating agent to loosen it up and attempt to wiggle it loose.
57C. How many Shim Washers do I need?
Standard is 8 but if you are using a Torsional Damper, you only need 7.
58C. How do I know if my Bearing is worn out? Is there a way that I can test it?
If you start to hear grinding, this may be an indication that your bearing is near the end of its life. To investigate, dismount the Jet from the outboard and remove the shaft assembly. Hold the shaft in one hand and the bearing carrier in the other. If the bearing is in good shape, you should feel consistent resistance and hear nothing.
59C. I installed a new bolt-in Liner, but the bolts are too long, did I get the wrong parts?
No, due to the taper of the liner, we include bolts that protrude past the Liner to provide maximum contact which ensures the Liner will be properly secured. Use a dye grinder to grind the threads down just far enough so that the Impeller will clear. A power drill with a grinding stone can also work if you don’t have a dye grinder.
60C. I took apart my Jet and when I put it back together, almost all my performance is gone. What happened?
Here are some possible causes…
- Your Impeller either has too much gap or not enough
- Your gate is not locking into forward.
- Check to make sure your Intake isn't on backwards. That may sound ridiculous, but it happens more than you might think.
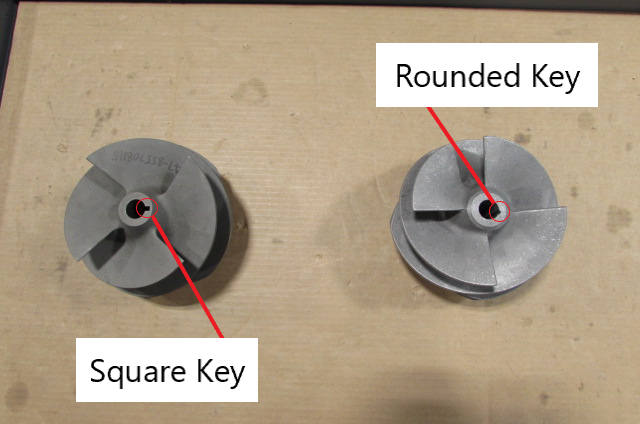
61C. Which Impeller Key do I need?
Before placing an order, you should figure out whether you have a square or rounded Impeller Key. The picture below should help.
62C. Why does my Impeller have a pinhole drilled through it?
This hole is there by design. It allows water trapped in the Impeller hub to drain out.
63C. Will sharpening my grill bars improve my performance?
For 99% of Jet Boats, the answer is no. The only time this can be beneficial is if you have a Jet Boat specifically set up for drag racing.
64C. When I shift into neutral, my boat won't stay in place. How do I adjust the gate position?
First, shift into neutral then begin to rotate the Eccentric, (Identified in FAQ 22C). Doing this will adjust the gap between the top of the gate and the bottom of the housing. For Medium Jets, the gap must be 9/16" and Large Jets must be set at 15/32". See Image Below.

65C. Why is there water seeping out between my Mid-Section and Jet?
This is most likely caused by the cooling system. The cooling system on an Outboard fitted with a Jet is under pressure and will seek out any outlets it can find. If you see water seeping out but the engine is functioning normally and the overheat alarm is not alerting then you are probably okay because Jets pump water much better than a Gear Case and so even with leaks, the Outboard is receiving sufficient cool water. If you do not have an overheat alarm or suspect that yours is defective, place your hand in front the water outlet stream on the rear of the cowling. If this water is scalding hot, you probably have a cooling issue. If your water outlet is not creating a stream, you have an issue. The water can be warm if the Outboard has been running for an extended period but should not be scalding hot. If your Outboard is pumping a strong stream of water at both idle and while cruising and has an acceptable temperature, it could be caused by loose mounting bolts. You should check to make sure that all the bolts are properly tightened down. If the bolts are tight and the cooling system is in working order, then you can disregard the leaks. If the amount of water seeping out begins to increase at any time, follow these guidelines and if the issue is still not resolved, call us.
66C. Why is grease coming out of a little hole on the starboard side of my Jet Housing?
This is a pressure relief hole, which is connected to the bearing assembly. If too much pressure builds inside the bearing housing, a small amount of grease will seep out of this hole. If large quantities of grease appear or if grease continues to appear after every use, you may have a seal failure.
67C. Why is water coming out of a little hole on the starboard side of my Jet Housing?
This is a pressure relief hole, which is connected to the bearing assembly. If the bearing carrier bolts become loose, the intense water pressure inside the jet will force its way out of the pressure relief hole. Check that the bearing carrier bolts are properly tightened down. This could also be the result of a seal failure
68C. My engine isn’t pumping water, What could be causing this.
There are several issues that could be afoot. If the engine isn’t pumping water at idle but is pumping when throttle is applied, this is most likely an issue with the water pump impeller. If it hasn’t been replaced in a while, it could have broken blades or a broken key. If it was replaced recently, the issue could be that the impeller was installed incorrectly or not at all. If the issue is prevalent even when throttle is applied, you may have a clog in the thermostat or a leak somewhere in the system. Make sure that the water pump housing mates up to the brass water tube.